下载APP
关闭
讲堂
前端训练营
极客商城
客户端下载
兑换中心
企业版
渠道合作
推荐作者

31 | WordCount Beam Pipeline实战

2019-07-05 蔡元楠
大规模数据处理实战
进入课程

讲述:阿墨

时长08:10大小11.24M

你好,我是蔡元楠。

今天我要与你分享的主题是“WordCount Beam Pipeline 实战”。

前面我们已经学习了 Beam 的基础数据结构 PCollection,基本数据转换操作 Transform,还有 Pipeline 等技术。你一定跃跃欲试,想要在实际项目中使用了。这一讲我们就一起学习一下怎样用 Beam 解决数据处理领域的教科书级案例——WordCount。

WordCount 你一定不陌生,在第 18 讲中,我们就已经接触过了。WordCount 问题是起源于 MapReduce 时代就广泛使用的案例。顾名思义,WordCount 想要解决的问题是统计一个文本库中的词频。

比如,你可以用 WordCount 找出莎士比亚最喜欢使用的单词,那么你的输入是莎士比亚全集,输出就是每个单词出现的次数。举个例子,比如这一段:

HAMLET
ACT I
SCENE I Elsinore. A platform before the castle.
[FRANCISCO at his post. Enter to him BERNARDO]
BERNARDO Who's there?
FRANCISCO Nay, answer me: stand, and unfold yourself.
BERNARDO Long live the king!
FRANCISCO Bernardo?
BERNARDO He.
FRANCISCO You come most carefully upon your hour.
BERNARDO 'Tis now struck twelve; get thee to bed, Francisco.
FRANCISCO For this relief much thanks: 'tis bitter cold,
And I am sick at heart.
BERNARDO Have you had quiet guard?
FRANCISCO Not a mouse stirring.
BERNARDO Well, good night.
If you do meet Horatio and Marcellus,
The rivals of my watch, bid them make haste.
FRANCISCO I think I hear them. Stand, ho! Who's there?
复制代码

在这个文本库中,我们用“the: 数字”表示 the 出现了几次,数字就是单词出现的次数。

The: 3
And: 3
Him: 1
...
复制代码

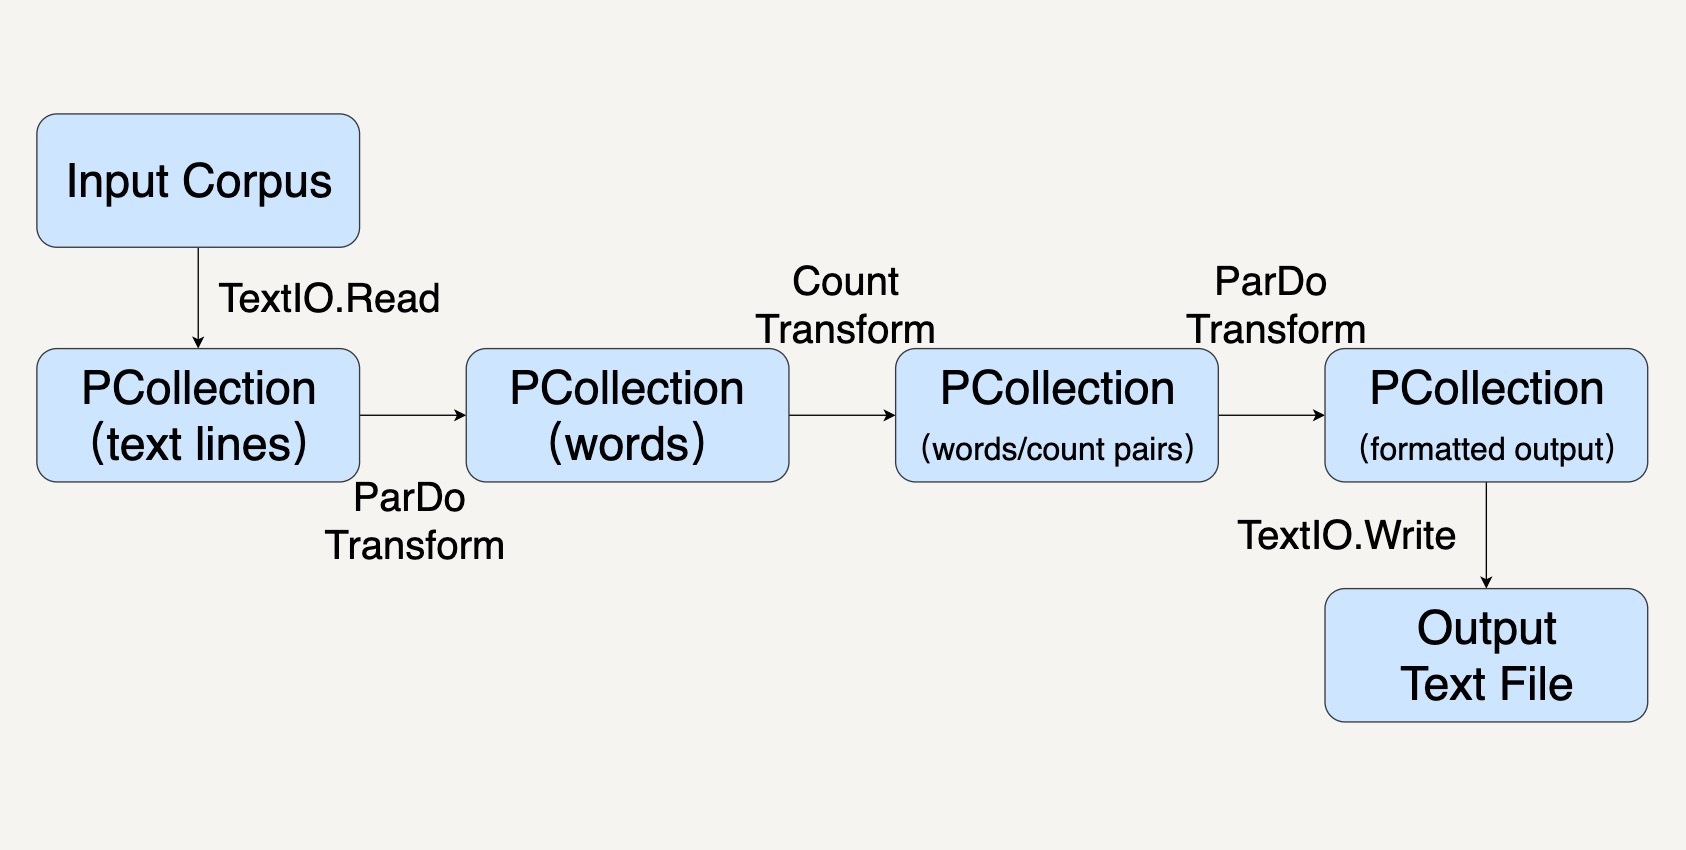
那么我们怎样在 Beam 中处理这个问题呢?结合前面所学的知识,我们可以把 Pipeline 分为这样几步:

  1. 用 Pipeline IO 读取文本库(参考第 27 讲);
  2. 用 Transform 对文本进行分词和词频统计操作(参考第 25 讲);
  3. 用 Pipeline IO 输出结果(参考第 27 讲);
  4. 所有的步骤会被打包进一个 Beam Pipeline(参考第 26 讲)。

整个过程就如同下图所示。

创建 Pipeline

首先,我们先用代码创建一个 PipelineOptions 的实例。PipelineOptions 能够让我们对 Pipeline 进行必要的配置,比如配置执行程序的 Runner,和 Runner 所需要的参数。我们在这里先采用默认配置。

记得第 30 讲中我们讲过,Beam Pipeline 可以配置在不同的 Runner 上跑,比如 SparkRunner,FlinkRunner。如果 PipelineOptions 不配置的情况下,默认的就是 DirectRunner,也就是说会在本机执行。

Java

PipelineOptions options = PipelineOptionsFactory.create();
复制代码

接下来,我们就可以用这个 PipelineOptions 去创建一个 Pipeline 了。一个 Pipeline 实例会去构建一个数据处理流水线所需要的数据处理 DAG,以及这个 DAG 所需要进行的 Transform。

Java

Pipeline p = Pipeline.create(options);
复制代码

应用 Transform

在上面的设计框图中,我们可以看到,我们需要进行好几种 Transform。比如 TextIO.Read、ParDo、Count 去读取数据,操纵数据,以及存储数据。

每一种 Transform 都需要一些参数,并且会输出特定的数据。输入和输出往往会用 PCollection 的数据结构表示。简单回顾一下,PCollection 是 Beam 对于数据集的抽象,表示任意大小、无序的数据,甚至可以是无边界的 Streaming 数据。

在我们这个 WordCount 例子中,我们的 Transform 依次是这样几个。

第一个 Transform,是先要用 TextIO.Read 来读取一个外部的莎士比亚文集,生成一个 PCollection,包含这个文集里的所有文本行。这个 PCollection 中的每个元素都是文本中的一行。

Java

PCollection<String> lines = p.apply(TextIO.read().from("gs://apache-beam-samples/shakespeare/*"));
复制代码

第二个 Transform,我们要把文本行中的单词提取出来,也就是做分词(tokenization)。

这一步的输入 PCollection 中的每个元素都表示了一行。那么输出呢?输出还是一个 PCollection,但是每个元素变成了单词。

你可以留意一下,我们这里做分词时,用的正则表达式 [^\p{L}]+,意思是非 Unicode Letters 所以它会按空格或者标点符号等把词分开。

Java

PCollection<String> words = lines.apply("ExtractWords", FlatMapElements
.into(TypeDescriptors.strings())
.via((String word) -> Arrays.asList(word.split("[^\\p{L}]+"))));
复制代码

第三个 Transform,我们就会使用 Beam SDK 提供的 Count Transform。Count Transform 会把任意一个 PCollection 转换成有 key/value 的组合,每一个 key 是原来 PCollection 中的非重复的元素,value 则是元素出现的次数。

Java

PCollection<KV<String, Long>> counts = words.apply(Count.<String>perElement());
复制代码

第四个 Transform 会把刚才的 key/value 组成的 PCollection 转换成我们想要的输出格式,方便我们输出词频。因为大部分的时候,我们都是想要把输出存储到另一个文件里的。

Java

PCollection<String> formatted = counts.apply("FormatResults", MapElements
.into(TypeDescriptors.strings())
.via((KV<String, Long> wordCount) -> wordCount.getKey() + ": " + wordCount.getValue()));
复制代码

最后一个 Transform 就是 TextIO.Write 用来把最终的 PCollection 写进文本文档。PCollection 中的每一个元素都会被写为文本文件中的独立一行。

运行 Pipeline

调用 Pipeline 的 run() 方法会把这个 Pipeline 所包含的 Transform 优化并放到你指定的 Runner 上执行。这里你需要注意,run() 方法是异步的,如果你想要同步等待 Pipeline 的执行结果,需要调用 waitUntilFinish() 方法。

Java

p.run().waitUntilFinish();
复制代码

改进代码的建议

代码看起来都完成了,不过,我们还可以对代码再做些改进。

编写独立的 DoFn

在上面的示例代码中,我们把 Transform 都 inline 地写在了 apply() 方法里。

Java

lines.apply("ExtractWords", FlatMapElements
.into(TypeDescriptors.strings())
.via((String word) -> Arrays.asList(word.split("[^\\p{L}]+"))));
复制代码

但是这样的写法在实际工作中很难维护。

一是因为真实的业务逻辑往往比较复杂,很难用一两行的代码写清楚,强行写成 inline 的话可读性非常糟糕。

二是因为这样 inline 的 Transform 几乎不可复用和测试。

所以,实际工作中,我们更多地会去继承 DoFn 来实现我们的数据操作。这样每个 DoFn 我们都可以单独复用和测试。

接下来,我们看看怎样用用 DoFn 来实现刚才的分词 Transform?

其实很简单,我们继承 DoFn 作为我们的子类 ExtracrtWordsFn,然后把单词的拆分放在 DoFn 的 processElement 成员函数里。

Java

static class ExtractWordsFn extends DoFn<String, String> {
private final Counter emptyLines = Metrics.counter(ExtractWordsFn.class, "emptyLines");
private final Distribution lineLenDist =
Metrics.distribution(ExtractWordsFn.class, "lineLenDistro");
@ProcessElement
public void processElement(@Element String element, OutputReceiver<String> receiver) {
lineLenDist.update(element.length());
if (element.trim().isEmpty()) {
emptyLines.inc();
// Split the line into words.
String[] words = element.split(“[^\\p{L}]+”, -1);
// Output each word encountered into the output PCollection.
for (String word : words) {
if (!word.isEmpty()) {
receiver.output(word);
}
}
}
}
复制代码

创建 PTransform 合并相关联的 Transform

PTransform 类可以用来整合一些相关联的 Transform。

比如你有一些数据处理的操作包含几个 Transform 或者 ParDo,你可以把他们封装在一个 PTransform 里。

我们这里试着把上面的 ExtractWordsFn 和 Count 两个 Transform 封装起来。这样可以对这样一整套数据处理操作复用和测试。当定义 PTransform 的子类时,它的输入输出类型就是一连串 Transform 的最初输入和最终输出。那么在这里,输入类型是 String,输出类型是 KV<String, Long>。就如同下面的代码一样。

Java

/**
* A PTransform that converts a PCollection containing lines of text into a PCollection of
* formatted word counts.
*
* <p>This is a custom composite transform that bundles two transforms (ParDo and
* Count) as a reusable PTransform subclass. Using composite transforms allows for easy reuse,
* modular testing, and an improved monitoring experience.
*/
public static class CountWords
extends PTransform<PCollection<String>, PCollection<KV<String, Long>>> {
@Override
public PCollection<KV<String, Long>> expand(PCollection<String> lines) {
// Convert lines of text into individual words.
PCollection<String> words = lines.apply(ParDo.of(new ExtractWordsFn()));
// Count the number of times each word occurs.
PCollection<KV<String, Long>> wordCounts = words.apply(Count.perElement());
return wordCounts;
}
}
复制代码

参数化 PipelineOptions

刚才我们把输入文件的路径和输出文件的路径都写在了代码中。但实际工作中我们很少会这样做。

因为这些文件的路径往往是运行时才会决定,比如测试环境和生产环境会去操作不同的文件。在真正的实际工作中,我们往往把它们作为命令行参数放在 PipelineOptions 里面。这就需要去继承 PipelineOptions。

比如,我们创建一个 WordCountOptions,把输出文件作为参数 output。

Java

public static interface WordCountOptions extends PipelineOptions {
@Description("Path of the file to write to")
@Required
String getOutput();
void setOutput(String value);
}
复制代码

完成上面两个方面的改进后,我们最终的数据处理代码会是这个样子:

Java

public static void main(String[] args) {
WordCountOptions options =
PipelineOptionsFactory.fromArgs(args).withValidation().as(WordCountOptions.class);
Pipeline p = Pipeline.create(options);
p.apply("ReadLines", TextIO.read().from(options.getInputFile()))
.apply(new CountWords())
.apply(ParDo.of(new FormatAsTextFn()))
.apply("WriteCounts", TextIO.write().to(options.getOutput()));
p.run().waitUntilFinish();
}
复制代码

DoFn 和 PTransform 的单元测试

如同第 29 讲“如何测试 Pipeline”中所讲的那样,我们用 PAssert 测试 Beam Pipeline。具体在我们这个例子中,我一再强调要把数据处理操作封装成 DoFn 和 PTransform,因为它们可以独立地进行测试。

什么意思呢?比如,ExtractWordsFn 我们想要测试它能把一个句子分拆出单词,比如“" some input words ",我们期待的输出是 [“some”, “input”, “words”]。在测试中,我们可以这样表达:

/** Example test that tests a specific {@link DoFn}. */
@Test
public void testExtractWordsFn() throws Exception {
DoFnTester<String, String> extractWordsFn = DoFnTester.of(new ExtractWordsFn());
Assert.assertThat(
extractWordsFn.processBundle(" some input words "),
CoreMatchers.hasItems("some", "input", "words"));
Assert.assertThat(extractWordsFn.processBundle(" "), CoreMatchers.hasItems());
Assert.assertThat(
extractWordsFn.processBundle(" some ", " input", " words"),
CoreMatchers.hasItems("some", "input", "words"));
}
复制代码

小结

这一讲我们应用前面学习的 PCollection,Pipeline,Pipeline IO,Transform 知识去解决了一个数据处理领域经典的 WordCount 问题。并且学会了一些在实际工作中改进数据处理代码质量的贴士,比如写成单独可测试的 DoFn,和把程序参数封装进 PipelineOptions。

思考题

文中提供了分词的 DoFn——ExtractWordsFn,你能利用相似的思路把输出文本的格式化写成一个 DoFn 吗?也就是文中的 FormatAsTextFn,把 PCollection<KV<String, Long>> 转化成 PCollection,每一个元素都是 : 的格式。

欢迎你把答案写在留言区,与我和其他同学一起讨论。如果你觉得有所收获,也欢迎把文章分享给你的朋友。

unpreview

© 版权归极客邦科技所有,未经许可不得传播售卖。 页面已增加防盗追踪,如有侵权极客邦将依法追究其法律责任。
上一篇
FAQ第三期 | Apache Beam基础答疑
下一篇
32 | Beam Window:打通流处理的任督二脉
 写留言

精选留言

由作者筛选后的优质留言将会公开显示,欢迎踊跃留言。
收藏